When I first came across the Zigzag Spike Puff Stitch, I immediately dropped all of my other WIPs (works in progress) to learn the stitch. I quickly fell in love with how crisp and clean it turned out, and I knew that I had to make absolutely everything with this textured crochet stitch.
The Coco Trivet is the first pattern in the “Coco” collection, which will all use the zigzag spike puff stitch, and I expect there to be many more patterns added to the collection!

You might be wondering… what is the difference between a trivet and a pot holder? The biggest difference I find between a trivet and a potholder is the thickness. I find crochet potholders to be thin and flimsy, which I don’t trust to be a reliable heat-protectant when working in the kitchen. Some crochet potholders are designed for looks, not for functionality, often featuring a stitch pattern with holes in it.
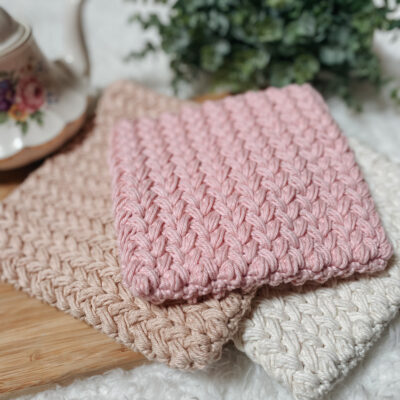
The Coco Trivet features a tight stitch pattern that offers both functionality and a beautiful appearance! The zigzag spike puff stitch is a thick, tight-worked stitch that will protect your hands while grabbing hot trays, it will protect your furniture from hot and steamy casserole dishes, and it will also bring a luxurious, textured look to your kitchen.
If you’d like to add this pattern to your permanent collection, you can grab the PDF copy at any of the following links:

YARN
When crocheting kitchen items that will be used around heat, it is very important to use cotton yarn. Acrylic yarn is made with plastic, therefor could melt when applied to hot objects for too long.
My favorite cotton yarn for kitchen projects is Dishie by WeCrochet! At first impression, it might feel a bit stiff, but it is softer than other cotton yarns I’ve tried. Plus, it has great durability, I have been working with Dishie for several years now, and it holds up so well to use, washing, drying, and pilling!
Dishie has over 50 colors to choose from, including over 20 multi-colored options!
YARDAGE
Small: 180yds
Medium: 230yds
Large: 290yds
MATERIALS
- Hook: 5.5mm hook
- Scissors
- Yarn needle
- Flexible tape measure
ABBREVIATIONS
- ch: chain
- slst: slip stitch
- sc: single crochet
- puff: puff stitch
- * to *: repeat
- rnd: round
- st(s): stitch(es)
GAUGE
There is no specific gauge, as I provide measurement guidelines in the pattern.
FINISHED MEASUREMENTS
Small: 7” square
Medium (recommended): 8” square
Large: 9” square
NOTES
- Written in US Terms
- Beginning ch 1 does NOT count as a stitch
- This potholder is worked in the round to provide a double layer of protection. You will start with a chain along the bottom, grow the sides, and end by stitching the top closed.
To create the puff stitch:
Yarn over and insert into the next stitch. Yarn over and pull through the stitch. You should have 3 loops on your hook.
Yarn over and insert into the same stitch. Yarn over and pull through the stitch. You should have 5 loops on your hook.
Yarn over and insert into the same stitch. Yarn over and pull through the stitch. You should have 7 loops on your hook.
Yarn over and pull through all of the loops on your hook.
When using the puff stitch:
With the exceptions of rounds 2 and 3, every puff stitch will be worked two rows below, to the right of that puff stitch (to the left if you are left handed).
Follow the photo tutorials watch the video tutorial at the end of the pattern.

START THE PATTERN
Decide which size you would like to make (refer to the finished measurements above).
When working your staring chain, ch loosely.
Small: Ch until you reach 6.5”
Medium: Ch until you reach 7.5”
Large: Ch until you reach 8.5”
Count and make note of your starting chain before beginning.
Rnd 1: Starting in the second ch from the hook, sc in each stitch across. Sc again in the last ch. Rotate your work 180 degrees so that you are now working along the other side of the starting chain. Sc again into that last ch (you should now have 3 sc in this ch), sc into each ch across. Sc again in the last ch (you should now have 3 sc in this ch, including the first ch from the beginning of this rnd) and slst to the starting stitch.
Refer to photo 1
At this point, you should have double the amount of stitches as your starting chain (do not count the slip stitch join).
Rnd 2: Ch 1 and turn. Puff in the first st, ch 1 and skip 1. *Puff, ch 1 and skip 1* around, ending on a ch 1 and skip 1. Slst into the space before the first puff.
Refer to photo 2
Rnd 3: Ch 1 and turn. Puff into the skipped sc from Rnd 1, ch 1. *Puff into the next skipped sc, ch 1* around. Slst into the space before the first puff.
Rnd 4: Ch 1 and turn. *Puff into the space directly before the puff two rows below, ch 1* around. Slst into the space before the first puff.
Refer to photos 3-4
Continue repeating Rnd 4 until…
- Small: your work measures 6.5-6.75” tall
- Medium: your work measures 7.5-7.75” tall
- Large: your work measures 8.5-8.75” tall
On the last rnd, we will work 4 decreasing sts to give a rounded finish to the top, just as we have on the bottom. 1 decrease in the first st, 1 in the last st, and 2 at the end opposing the join side. See next pg.
Last Rnd: Ch 1 and turn. Puff in the first space two rows below, just as you have been, do not ch. *Puff in the next space, sc into the top of the next puff from the previous row* repeat just along the first side of the round, pausing when you get to the end of the first side.
Puff in the next space, do not ch or sc. Repeat again.
*Puff in the next space, sc into the top of the next puff from the previous row* repeat until you have one puff left to work. Puff and immediately slst into the space before the first puff.
There is no official right side or wrong side, but you may now decide which side you like better. Flip that side outward.
Fasten off, leaving a tail that is 2-3 times the width of the trivet.
Attach a yarn needle to the tail. Whip stitch the top shut.
(Refer to photos x)
Weave in all ends.

Need the full video tutorial? Watch here!

I’d love to see your beautiful creation! If you share a photo of your work on social media, be sure to tag me so I can see it! You can also use the hashtags #CocoTrivet and #SassAndStitchCrochet
Im not sure if i missed it but Is there supposed to be a specific stitch count for the starting chain? Like even or odd?
Nope, it can be any number! Once you’ve worked the first row, your stitch count will be double of what your starting ch was, which will always make it an even number, regardless of how many you’ve chained.