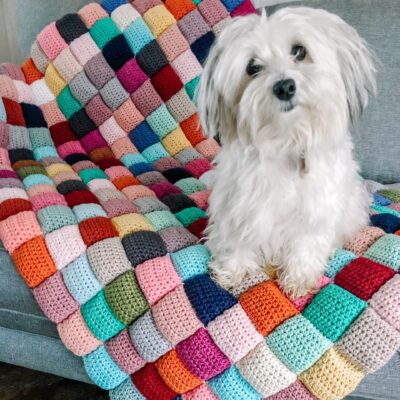
This might be my best pattern idea ever… and I’m sharing it with you for free!!
This year, I learned about the fabric version of puff quilts. If you have never heard of this, google it now. You will fall in love instantly!! Anyways, I don’t know how to sew, and I don’t have the time to get into a new hobby right now, soooo I decided to create a crochet version!

I am SO in love with how this turned out. It is exactly what I pictured when I first set out to create this pattern! And now I get to share it with you.
BUT BEFORE YOU FREAK OUT… I KNOW! It looks like a lot of work and a lot of yarn. I knew this coming into it, and I was brainstorming ways to make it more manageable and appealing to you all. My first thought? Make it a SCRAPPY blanket! For this project, I used only yarn scraps, partial skeins of yarn, or full skeins that I didn’t have any other project for. This has helped me cut down my stash tremendously! This quilt has also been designed to be a slow make. This takes a lot of time. Its not something you can work up in a week. But there’s something so rewarding about putting so much time and effort into such a beautiful make. So anyway, I hope you enjoy this pattern as much as I do!
If you would like the affordable PDF copy, complete with plenty of tutorial photos, you can click here for Etsy or click here for Ravelry.
Are you a visual learner and prefer a video? Click below to watch the full tutorial on Youtube!
YARN
I made this quilt entirely out of scrap yarn. All of my scrap yarn was Worsted #4 weight yarn, but I used a variety of brands and lines of yarn. You are free to use any kind of yarn for this project, as long as the yarn is similar enough weight from square to square.
MATERIALS
- Hook: (H)5.0mm, or hook size needed to meet gauge
- Polyfil Stuffing, Yarn Needle, Scissors, Measuring Tape
ABBREVIATIONS
- ch: chain
- rnd: round
- hdc: half double crochet
- slst: slip stitch
GAUGE
Each square measures 3″ x 3″, before stuffing. Follow along in the pattern and measure your square as you go to check gauge.
Meeting precise gauge is not extremely important, because of the flexible sizing of this blanket. You may attach as many squares together as you would like to achieve your desired size.
MY FINISHED MEASUREMENTS
54” x 54” (18 squares x 18 squares)
NOTES
- Written in US Terms
- Beginning ch 1 does NOT count as a stitch
- Each square will be worked in a flat round. You will gently stuff it, close the top, seam your square to form a row, and attach the row onto your blanket.
- I worked this blanket completely out of yarn scraps, but I chose to use all 100% cotton yarn. My preference was to use yarn all from the same fiber, but you can use your discretion.
- You will be seaming your blanket together with the back side facing up. If you are wanting a specific color arrangement, keep this in mind as you stitch your squares together. This will make more sense as you begin making your squares.
START THE PATTERN
Ch 11
Rnd 1: Starting in the second ch from the hook, hdc in each ch across. Rotate your work to the other side of the chain and hdc in each ch across. Slst to the starting stitch. (20 stitches)
*tip: when working along the second side of your ch, lay your starting tail down across the row and crochet over top of it to secure this tail without having to weave it in.
*tip: if needed, use a stitch marker at the beginning of each round to help keep track of your stitch count.
Rnd 2-8: Ch 1 and turn. Hdc in each of the next 20 stitches. Slst to the starting stitch. (20 stitches)
Fasten off, leaving a long tail (roughly 20″-24″).
Begin lightly stuffing your square. You don’t want to over-stuff to the point of stretching your square, but you want it to be a nice medium-plump. Attach a yarn needle to the end of your tail and use the whip stitch to begin seaming across the top. Finish filling in stuffing if needed, and whip stitch to the end, completely closing off your square. If this is your first square of a new row, you may go ahead and weave in this end.
Repeat this entire process for your next square, but don’t weave in your final end yet.
You will now seam 2 squares together, side-by-side. As you seam all of your squares together, you will be looking at the back side of the work. Keep this in mind as you seam, if you would like your colors to be in a specific arrangement.
With your yarn needle still attached, use the whip stitch to sew the side of this square to the side of your previous square. Avoid sewing the two squares together directly on the sides. You want to pick up loops slightly to the back of each square, so that the front can stay as puffy as possible.
Decide how wide you would like your blanket to be, in increments of 3″ (or increments of how wide each square is for you). Continue repeating this pattern until you have attached enough squares side by side to achieve your desired width. This will be one “row” of squares.
Complete a second full row of squares. Now, you will use the mattress stitch to seam two rows together (the bottom of the first row and the top of the second row). You will be using a completely separate strand of yarn for this, any color of your choosing. As you seam the two rows together, do not insert your yarn needle from the back to the front of the square. Keep the mattress stitch completely on the backside of the the rows.
Repeat this entire process for your entire project. Once you achieve your desired width and length, weave in all ends and enjoy!

Did you enjoy this post?

I’d love to see your beautiful creation! If you share a photo of your work on social media, be sure to tag me so I can see it! You can also use the hashtags #CrochetPuffQuilt and #SassAndStitchCrochet
Want to know how to wash your puff quilt? Click here to read my blog post and suggestions.
Do not alter, rewrite, share, or sell this pattern in any way. Do not use my photographs without my consent. You are more than welcome to sell the finished items that you made with this pattern. Please give credit to me in any listing or social media post.
Thanks for following along! If you enjoyed this pattern, consider following me and supporting me on my other platforms!
FIND ME ON
Instagram || https://www.instagram.com/sass.and.stitch
Facebook || https://www.facebook.com/Sass-and-Stitch-Crochet
Youtube || https://www.youtube.com/channel/UC0IzBOI2pp-cTrZKbYmL8zQ
Pinterest || https://www.pinterest.com/sassandstitch
Etsy || https://www.etsy.com/shop/SassAndStitchCrochet
Ravelry || https://www.ravelry.com/designers/sass–stitch-crochet
Email || [email protected]
<3 KAITLIN, SASS & STITCH

I absolutely love this Crochet Puff Quilt pattern! The texture looks amazing, and I can’t wait to try it out. Thank you for sharing such a lovely and free pattern!
I’m so glad! Thank you so much for your support!
I absolutely love the Crochet Puff Quilt pattern! The texture looks so cozy and inviting. I can’t wait to try it out and add my own colors. Thank you for sharing this beautiful design!
I loved this idea back in ’20 when I saw it on Pinterest and, it’s taking a while (the last 5 years) but I am loving the process. I am joining the squares using the Battenburg technique and using black yarn, I also went around each square in black yarn in single crochet. My dogs also love the puff squares!
Love to hear it! Can’t wait to see your finished blanket ☺️
I absolutely love this crochet puff quilt pattern! The texture looks amazing, and I can’t wait to try it out. Thank you for sharing such a detailed and easy-to-follow design! 💖
I absolutely love this Crochet Puff Quilt pattern! The puffs add such a fun texture, and the colors you’ve chosen are so cheerful. Can’t wait to give it a try! Thanks for sharing this free pattern!
I absolutely love this Crochet Puff Quilt pattern! It looks cozy and perfect for snuggling up on chilly nights. The puff stitches give it such a lovely texture. Can’t wait to give this a try! Thank you for sharing!