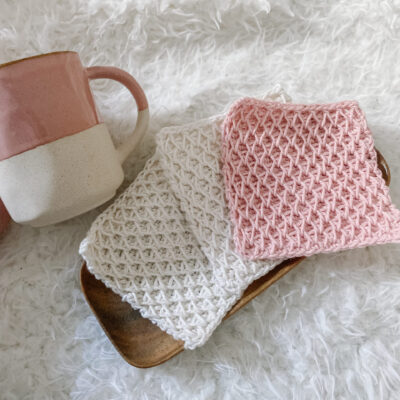
Looking to add some modern, handmade coasters to your home? The Apiary Coaster is an intermediate level crochet pattern that features the honeycomb stitch, which provides crisp, eye-catching texture!

I immediately ran to my hooks and scrap yarn when I came across a photo of the Honeycomb Stitch – I needed to learn it instantly! In my experience, there are very few other crochet stitches that have a texture such as this one. It provides an intriguing 3-d effect and looks a little different depending on the angle you look at it. There is a similar stitch in Tunisian Crochet, also called the Honeycomb Stitch, and I’m glad that us traditional crocheters get to enjoy this stitch detail too.
If you’re looking for a way to learn the Honeycomb Stitch on a small sample piece, but still have a finished item to show off at the end of the day, the Apiary Coaster is perfect for this! Take the next hour to add this stitch pattern to your repertoire. Let’s dive in to everything you’ll need to know!
You can purchase the print-friendly PDF here in my Etsy shop!

YARN
When crocheting an item that will be used around heat (like setting a hot cup of coffee on a coaster), it is very important to use cotton yarn. Acrylic yarn is made with plastic, therefor could melt when applied to hot objects for too long.
For this pattern, I used Cotlin Yarn, which is a cotton and linen blend! It is very soft to work with and comes in 40+ colors! Alternatively, any DK weight cotton yarn will work.
YARDAGE
50 yards per coaster
MATERIALS
- Hook: 5.0mm hook
- Scissors
- Flexible tape measure
ABBREVIATIONS
- ch: chain
- sc: single crochet
- sc-sp: single crochet spike
- sc2tog: single crochet 2 together
- WS: wrong side
- RS: right side
- * to *: repeat
- st(s): stitch(es)
GAUGE
2” x 2” = 7 sts x 11 rows
Due to the small size of the coaster already, I have provided a smaller gauge so that you can test before making the full coaster.
Ch 13. Follow the pattern for a total of 14 rows. Measure in the middle to check gauge.
FINISHED MEASUREMENTS
5″ square
NOTES
- Written in US Terms
- Beginning ch 1 does NOT count as a stitch
START THE PATTERN
Ch 19.
Row 1: Starting in the second ch from the hook, sc across.
Row 2 (WS): Ch 1 and turn. Sc in the first st. Sc-sp in the down into the second ch from the starting ch.

This will cover up a sc from Row 1 – you will skip this and move to the next st. *Sc, sc-sp down into the starting ch* across, ending on a sc-sp.
Row 3 (RS): Ch 1 and turn. Take notice of the slightly longer “legs” of the sc-sp stitches from the previous row.

Sc in the first st (which is the sc-sp from the previous row). Insert under the last leg of the first sc-sp and the first leg of the next sc-sp and sc2tog: yarn over and pull through two, yarn over pull through two.


*Sc in the next st, sc2tog in the last leg of the previous sc-sp and the first leg of the next sc-sp* across until two sts remain. Sc in the next st. For the last st, sc2tog in the last leg of the previous sc-sp and a leg of the last sc from the previous row.

Row 4 (WS): Ch 1 and turn. Sc-sp in the first st from two rows below (glance at the other side while inserting your hook – you should insert between the upside down “v” on the RS of the work.


*Sc in the next st, sc-sp in the next st from two rows below (between the “v” on the RS)* across until one st remains. Sc in the last st.
Row 5 (RS): Ch 1 and turn. Sc2tog in the first leg of the first sc and the first leg of the next sc-sp.

*Sc in the next st, sc2tog in the last leg of the previous sc-sp and the first leg of the next sc-sp* across until one st remains. Sc in the last st.
Row 6 (WS): Ch 1 and turn. Sc in the first st. *Sc-sp in the next st from two rows below (in between the “v” on the RS), sc in the next st* across until one st remains. Sc-sp in the last st from two rows below.
Repeat Rows 3-6 until your work measures approximately 5” tall, ending on a Row 3 or Row 5 repeat.
Fasten off and weave in all ends. Block if you have trouble with curling.

Find the Etsy PDF here
Find the Ravelry PDF here
Need the video tutorial for the Apiary Coaster? Watch below!
I’d love to see your beautiful Apiary Coasters! If you share a photo of your work on social media, be sure to tag me so I can see it! You can also use the hashtags #ApiaryCoaster and #SassAndStitchCrochet


Leave a Reply