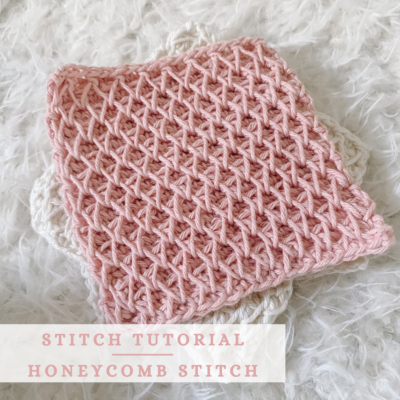
The Honeycomb Stitch is an intermediate level crochet stitch that provides crisp, eye-catching texture! There is no other traditional crochet stitch that compares!

If you’re familiar with Tunisian Crochet, you’ll find the appearance of this stitch to be similar to the Tunisian version of the honeycomb stitch – the traditional version and Tunisian seem to be pretty interchangeable, which is rare to find between the two crafts!
You’ll also find that this a tighter-woven stitch, making it perfect for things like coasters, washcloths, sweaters, and more! Ready to add this textured crochet stitch to your repertoire? Follow the written pattern below or watch the video tutorial here!
Let’s Begin
MATERIALS
For this stitch, you may use any yarn that you are comfortable using, plus a hook size that is 1-2 sizes larger than the usual suggested size. In the photos, I am using WeCrochet CotLin and an 5.0mm hook. Any yarn weight will work while you practice this stitch!
ABBREVIATIONS
- ch: chain
- fsc: foundation single crochet
- sc: single crochet
- sc-sp: single crochet spike
- sc2tog: single crochet 2 together
- WS: wrong side
- RS: right side
- * to *: repeat
- st(s): stitch(es)
Begin The Stitch Pattern
Start a foundation chain. You may chain any odd number. I recommend a chain of at least 15.
Row 1: Starting in the second ch from the hook, sc across.
Row 2 (WS): Ch 1 and turn. Sc in the first st. Sc-sp in the down into the second ch from the starting ch.

This will cover up a sc from Row 1 – you will skip this and move to the next st. *Sc, sc-sp down into the starting ch* across, ending on a sc-sp.
Row 3 (RS): Ch 1 and turn. Take notice of the slightly longer “legs” of the sc-sp stitches from the previous row.

Sc in the first st (which is the sc-sp from the previous row). Insert under the last leg of the first sc-sp and the first leg of the next sc-sp and sc2tog: yarn over and pull through two, yarn over pull through two.


*Sc in the next st, sc2tog in the last leg of the previous sc-sp and the first leg of the next sc-sp* across until two sts remain. Sc in the next st. For the last st, sc2tog in the last leg of the previous sc-sp and a leg of the last sc from the previous row.

Row 4 (WS): Ch 1 and turn. Sc-sp in the first st from two rows below (glance at the other side while inserting your hook – you should insert between the upside down “v” on the RS of the work.


*Sc in the next st, sc-sp in the next st from two rows below (between the “v” on the RS)* across until one st remains. Sc in the last st.
Row 5 (RS): Ch 1 and turn. Sc2tog in the first leg of the first sc and the first leg of the next sc-sp.

*Sc in the next st, sc2tog in the last leg of the previous sc-sp and the first leg of the next sc-sp* across until one st remains. Sc in the last st.
Row 6 (WS): Ch 1 and turn. Sc in the first st. *Sc-sp in the next st from two rows below (in between the “v” on the RS), sc in the next st* across until one st remains. Sc-sp in the last st from two rows below.
Repeat Rows 3-6 until you reach the length you desire, ending on a Row 3 or Row 5 repeat.
Fasten off and weave in all ends.
Need the video tutorial for the Honeycomb Crochet stitch? Watch below!


Leave a Reply